Exponential Population Growth class 12 ecology

Facts from the Page (Exponential Population Growth)

  • Population growth can occur when resources like food and space are unlimited.
  • Under ideal conditions, population shows exponential growth.
  • The increase depends on:
    • Birth rate (b)
    • Death rate (d)

Example values of rrr:

  • Norway rat → 0.015
  • Flour beetle → 0.12
  • Human population → 0.16

Any species can grow exponentially for some time if resources are unlimited. Exponential growth produces a J-shaped curve. In the graph:

  • KKrepresents carrying capacity.

Population cannot grow indefinitely in nature because environmental resistance and limited resources act as checks.

Facts from the “King and Wheat” Story

  • A king offered a reward to a wise man.
  • The wise man asked for wheat grains on a chessboard:
    • 1 grain on first square
    • 2 on second
    • 4 on third
    • doubling on every next square
  • Total squares on chessboard = 64.
  • The number of grains increased enormously.
  • The king’s entire kingdom could not supply so much wheat.
  • This story demonstrates:
    • Exponential increase
    • Population can grow rapidly under unlimited conditions
    • Resources eventually become insufficient

Nutrition in Human Beings – Important Facts class 10 C

  • The digestive system consists of the alimentary canal extending from mouth to anus.
  • Different parts of the alimentary canal are specialised for different functions.
  • Food is broken into small particles for easy digestion and absorption.

Mouth and Buccal Cavity

  • Teeth crush and grind food.
  • Saliva is secreted by salivary glands.
  • Saliva contains the enzyme salivary amylase.
  • Salivary amylase converts starch into simple sugars.
  • The tongue mixes food with saliva and helps in swallowing.
  • Food becomes soft and moist for smooth passage.

Oesophagus and Peristalsis

  • Food passes from mouth to stomach through the oesophagus (food pipe).
  • Rhythmic contraction and relaxation of muscles push food forward.
  • These movements are called peristaltic movements.

Stomach

  • The stomach is a muscular expandable organ.
  • Gastric glands in the stomach wall secrete:
    • Hydrochloric acid (HCl)
    • Pepsin (protein-digesting enzyme)
    • Mucus
  • HCl creates an acidic medium for pepsin action.
  • HCl also kills harmful germs present in food.
  • Mucus protects the stomach lining from acid.
  • Food is released slowly into the small intestine through a sphincter muscle.

Small Intestine

  • The small intestine is the longest part of the alimentary canal.
  • Complete digestion of carbohydrates, proteins, and fats occurs here.
  • Herbivores have longer small intestines than carnivores.

Role of Liver

  • The liver secretes bile juice.
  • Bile:
    • Makes acidic food alkaline.
    • Breaks large fat globules into smaller droplets (emulsification).

Role of Pancreas

  • The pancreas secretes pancreatic juice.
  • Pancreatic enzymes include:
    • Trypsin → digests proteins.
    • Lipase → digests fats.

Intestinal Juice

  • Intestinal glands secrete intestinal juice.
  • Final digestion converts:
    • Proteins → amino acids
    • Carbohydrates → glucose
    • Fats → fatty acids and glycerol

Absorption

  • The inner lining of the small intestine has finger-like projections called villi.
  • Villi increase surface area for absorption.
  • Villi contain many blood vessels.
  • Absorbed nutrients are transported to all body cells.

Large Intestine and Egestion

  • Undigested food enters the large intestine.
  • Water is absorbed from the remaining material.
  • Waste is removed through the anus.
  • The anal sphincter controls the exit of waste.

Facts – Nutrition in Unicellular Organisms class 10th CBSE

  • Different organisms have different digestive systems because:
    • Their food differs.
    • Their method of obtaining food differs.
  • In simple unicellular organisms, food is taken in through the entire body surface.
  • As organisms become more complex, different body parts become specialised for digestion.

Amoeba

  • Amoeba uses temporary finger-like projections called pseudopodia to capture food.
  • The pseudopodia surround the food particle and form a food vacuole.
  • Inside the food vacuole:
    • Complex food substances are broken into simpler substances.
    • Digested food diffuses into the cytoplasm.
  • Undigested food is moved to the cell surface and expelled outside.

Paramoecium

  • Paramecium has a fixed body shape.
  • Food enters through a specific spot in the body.
  • Tiny hair-like structures called cilia help in feeding.
  • Movement of cilia pushes food towards the food intake region.

The Pistil, Megasporangium (ovule) and Embryo sac Class 12

Facts about Gynoecium, Ovule and Embryo Sac

Gynoecium

  1. Gynoecium is the female reproductive part of a flower.
  2. It may consist of:
    • One pistil → Monocarpellary
    • More than one pistil → Multicarpellary
  3. Multicarpellary pistils may be:
    • Fused together → Syncarpous
    • Free from each other → Apocarpous
  4. Each pistil has three parts:
    • Stigma – receives pollen grains
    • Style – slender stalk below stigma
    • Ovary – swollen basal part
  5. Inside the ovary is the ovarian cavity (locule).
  6. Placenta is present inside the ovary and bears ovules.

Ovule (Megasporangium)

  1. Ovules arise from the placenta.
  2. Ovules are also called megasporangia.
  3. Number of ovules may vary:
    • One ovule → wheat, paddy, mango
    • Many ovules → papaya, watermelon, orchids
  4. Ovule is attached to placenta by a stalk called funicle.
  5. The point where funicle joins ovule is called hilum.
  6. Ovule has one or two protective layers called integuments.
  7. Integuments leave a small opening called micropyle.
  8. The opposite end of micropyle is called chalaza.
  9. The central tissue inside ovule is called nucellus.
  10. Nucellus stores reserve food material.
  11. Female gametophyte or embryo sac is present inside nucellus.
  12. Usually one embryo sac develops from one megaspore.

Megasporogenesis

  1. Formation of megaspores from megaspore mother cell is called megasporogenesis.
  2. Megaspore mother cell undergoes meiosis to form megaspores.
  3. Usually four megaspores are produced.
  4. Generally only one megaspore remains functional.

Embryo Sac Development

  1. Functional megaspore develops into embryo sac.
  2. Nucleus divides mitotically to form:
  • 2-nucleate stage
  • 4-nucleate stage
  • 8-nucleate stage
  1. Initial nuclear divisions are free nuclear divisions (without cell wall formation).
  2. Later cell walls form and organise the embryo sac.
  3. Typical angiosperm embryo sac is:
  • 8-nucleate
  • 7-celled

Structure of Embryo Sac

  1. Three cells at micropylar end form the egg apparatus.
  2. Egg apparatus consists of:
  • One egg cell
  • Two synergids
  1. Synergids possess filiform apparatus.
  2. Filiform apparatus helps guide pollen tube.
  3. Three cells at chalazal end are called antipodals.
  4. Central cell contains two polar nuclei.
  5. Polar nuclei later participate in double fertilisation.

Important Terms

  1. Micropyle → opening for pollen tube entry
  2. Chalaza → basal region of ovule
  3. Hilum → junction of ovule and funicle
  4. Funicle → stalk attaching ovule to placenta
  5. Nucellus → nutritive tissue of ovule
  6. Embryo sac → female gametophyte of angiosperms

Important Structures from “The Pistil, Megasporangium (Ovule) and Embryo Sac”

(Class 12 Biology – CBSE Boards)


1. Structure of Pistil (Most Basic Diagram)

Important Labels

  • Stigma
  • Style
  • Ovary
  • Ovule

Important Terms

  • Monocarpellary
  • Multicarpellary
  • Syncarpous
  • Apocarpous

Board Questions

  • Draw labelled diagram of pistil.
  • Differentiate syncarpous and apocarpous.

2. Structure of Ovule (VERY IMPORTANT)

Most Important Labels

  • Funicle
  • Hilum
  • Micropyle
  • Chalaza
  • Integuments
  • Nucellus
  • Embryo sac

Must Learn Definitions

  • Funicle → stalk attaching ovule to placenta
  • Hilum → junction of ovule and funicle
  • Micropyle → opening in integuments
  • Chalaza → basal end opposite micropyle
  • Nucellus → nutritive tissue

Frequently Asked

  • Draw labelled diagram of anatropous ovule.
  • What is micropyle/hilum/chalaza?

3. Megasporogenesis

Important Points

  • Megaspore mother cell undergoes meiosis.
  • Four megaspores formed.
  • Usually one functional megaspore survives.

Important Terms

  • MMC (Megaspore Mother Cell)
  • Functional megaspore

Board Questions

  • Define megasporogenesis.
  • Why is embryo sac monosporic?

4. Structure of Embryo Sac (MOST IMPORTANT)

Must Learn Labels

  • Egg cell
  • Synergids
  • Filiform apparatus
  • Polar nuclei
  • Central cell
  • Antipodals
  • Micropylar end
  • Chalazal end

Key Facts

  • Embryo sac is:
    • 7-celled
    • 8-nucleate
  • Egg apparatus consists of:
    • 1 egg cell
    • 2 synergids
  • Central cell contains 2 polar nuclei.
  • Antipodals present at chalazal end.

Most Important Board Questions

  • Draw labelled diagram of mature embryo sac.
  • Explain 7-celled 8-nucleate condition.
  • What is filiform apparatus?

Most Important Structures to Memorise for Boards

StructureImportance
PistilBasic
OvuleVery Important
MegasporogenesisImportant Process
Embryo SacMOST IMPORTANT

One-Line Revision

  • Micropyle → pollen tube entry
  • Hilum → ovule-funicle junction
  • Nucellus → food tissue
  • Synergids → guide pollen tube
  • Antipodals → chalazal cells
  • Polar nuclei → triple fusion
  • Embryo sac → female gametophyte

The type of Heterotrophic nutrition depends on

  • Type of food available
  • Availability of food
  • Method of obtaining food

Type of food available
Example:

  • A cow eats grass (plant food).
  • A lion eats flesh (animal food).

Availability of food
Example:

  • Fungi grow on dead and decaying matter where such food is available.
  • Parasites live on living organisms to obtain food continuously.

Method of obtaining food
Example:

  • Amoeba engulfs food with pseudopodia.
  • Human beings chew and digest food inside the body.
  • Cuscuta absorbs food from host plants.

Chapter Eleven : DUAL NATURE OF RADIATION AND MATTER NCERT (TOPIC 1 INTRODUCTION)

  • Maxwell’s equations and the experiments of Heinrich Hertz in 1887 proved that light behaves as an electromagnetic wave.
  • Experiments with electric discharge through gases at very low pressure helped scientists discover new particles and radiations.
  • Wilhelm Conrad Roentgen discovered X-rays in 1895.
  • J. J. Thomson discovered the electron in 1897.
  • In a discharge tube containing gas at very low pressure, applying a high electric field caused a discharge and produced a fluorescent glow on the glass wall opposite the cathode.
  • William Crookes discovered cathode rays in 1870 and proposed that they were streams of fast-moving negatively charged particles.
  • J. J. Thomson later confirmed this idea experimentally using electric and magnetic fields and measured the speed and charge-to-mass ratio of these particles, which were later called electrons.

This passage continues the story of the discovery of the electron and explains important experimental results.

Main points

  • J. J. Thomson measured the specific charge of cathode ray particles:
  • The particles moved at speeds about .1C to .2C

where (c) is the speed of light.

  • The value of (e/m) was the same regardless of:
    • the metal used as the cathode,
    • or the gas inside the discharge tube.

This showed that cathode ray particles are universal and present in all matter.

Discovery of electrons from other experiments

Scientists also found that:

  • ultraviolet light falling on some metals caused emission of negative particles (photoelectric effect),
  • heated metals also emitted negative particles (thermionic emission).

The emitted particles had the same (e/m) ratio as cathode rays, proving they were identical.

Naming of the electron

In 1897, J. J. Thomson named these particles electrons and proposed that they are fundamental constituents of matter.

He received the Nobel Prize in Physics in 1906 for this work.

Millikan’s oil-drop experiment

In 1913, Robert Andrews Millikan measured the charge of the electron using the famous oil-drop experiment.

He found the elementary charge:

He also showed that electric charge is quantized, meaning charge always exists in whole-number multiples of this elementary charge.

Qualitative analysis of salt – key facts JEE/NEET

Salt analysis is a systematic method used to detect the cation and anion present in a given salt using dry and wet tests.

METHODS OF SALT ANALYSIS

1. Dry Tests

  • Flame test
  • Borax bead test
  • Charcoal cavity test
  • Cobalt nitrate test
  • Heating test

2. Wet Tests

  • Preliminary test (solubility test)
  • Anion analysis (acid radical tests)
  • Cation analysis (group analysis)
  • Confirmatory tests

3. Special Tests

  • Brown ring test
  • Lime water test
  • Chromyl chloride test
  • Lead acetate test
  • Nessler’s test

CATION GROUPS (Basic Radicals)

Group I (Dilute HCl group)

  • Ag⁺
  • Pb²⁺
  • Hg₂²⁺

Group II (H₂S in acidic medium)

Group II A (Copper group)

  • Cu²⁺
  • Cd²⁺
  • Hg²⁺
  • Pb²⁺
  • Bi³⁺

Group II B (Arsenic group)

  • As³⁺ / As⁵⁺
  • Sb³⁺ / Sb⁵⁺
  • Sn²⁺ / Sn⁴⁺

Group III (NH₄Cl + NH₄OH group)

  • Fe³⁺
  • Al³⁺
  • Cr³⁺

Group IV (H₂S in basic medium)

  • Zn²⁺
  • Mn²⁺
  • Ni²⁺
  • Co²⁺

Group V ((NH₄)₂CO₃ group)

  • Ba²⁺
  • Sr²⁺
  • Ca²⁺

Group VI (No group reagent)

  • Mg²⁺
  • Na⁺
  • K⁺
  • NH₄⁺

What is a Group Reagent?

A group reagent is a chemical reagent used in salt analysis to precipitate a specific group of cations together based on their similar properties.

Do anions have groups in salt analysis?

No, anions do not have a fixed “group system” like cations.


Why not?

  • Cations are grouped based on systematic precipitation using group reagents
  • Anions do not show such uniform precipitation behavior
  • Different anions require different specific tests

In qualitative analysis, dry tests are performed without dissolving the salt in solution. In a flame test, the salt (usually converted to its chloride) is directly heated in a flame, so it falls under dry tests. Flame test is done by heating a salt (on a clean wire loop with HCl) in a non-luminous flame and observing the characteristic color.

COMPLETE FLAME TEST LIST

1. Alkali Metals (Group 1) — Very important

  • Li⁺ (Lithium) → Crimson red
  • Na⁺ (Sodium) → Intense golden yellow
  • K⁺ (Potassium) → Lilac / pale violet (seen through cobalt glass)
  • Rb⁺ (Rubidium) → Red-violet
  • Cs⁺ (Caesium) → Blue-violet

2. Alkaline Earth Metals (Group 2)

  • Be²⁺ (Beryllium) → No colour
  • Mg²⁺ (Magnesium) → No colour
  • Ca²⁺ (Calcium) → Brick red (orange-red)
  • Sr²⁺ (Strontium) → Crimson red
  • Ba²⁺ (Barium) → Apple green

3. Transition & Post-Transition Metals

  • Cu⁺ / Cu²⁺ (Copper) → Bluish green
  • Pb²⁺ (Lead) → Bluish white (faint)
  • Tl⁺ (Thallium) → Bright green

Most others do NOT give a characteristic flame colour:

  • Fe²⁺ / Fe³⁺ → No colour
  • Co²⁺ → No colour
  • Ni²⁺ → No colour
  • Zn²⁺ → No colour
  • Mn²⁺ → No colour
  • Al³⁺ → No colour

4. Ions Showing NO Flame Colour (Important for elimination)

  • Be²⁺, Mg²⁺, Al³⁺
  • Zn²⁺, Fe²⁺/Fe³⁺, Co²⁺, Ni²⁺, Mn²⁺
    Reason: emission not in visible region / weak excitation

IMPORTANT EXAM FACTS

1. Sodium Interference

  • Na⁺ gives very intense yellow
  • Masks all other colours

Solution: Use cobalt glass to detect K⁺


2. Why flame colour appears?

  • Due to electronic excitation and emission spectrum

3. Best observed for:

  • Volatile salts (usually chlorides)

What is a Wet Test?

A wet test is a method in salt analysis where the substance is first dissolved in a solvent (usually water or acid) and then tested using chemical reactions.

COLOURS OF CATION RADICALS

1. Coloured Ions (VERY IMPORTANT)

  • Cu²⁺ (Copper) → Blue solution
  • Fe²⁺ (Ferrous) → Pale green
  • Fe³⁺ (Ferric) → Yellow / brown
  • Ni²⁺ (Nickel) → Green
  • Co²⁺ (Cobalt) → Pink
  • Cr³⁺ (Chromium) → Green / violet
  • Mn²⁺ (Manganese) → Very pale pink
  • V³⁺ (Vanadium) → Green
  • Ti³⁺ (Titanium) → Purple

2. Colourless Ions (VERY COMMON MCQ)

  • Na⁺
  • K⁺
  • NH₄⁺
  • Mg²⁺
  • Ca²⁺
  • Ba²⁺
  • Sr²⁺
  • Al³⁺
  • Zn²⁺

3. Characteristic Precipitate Colours (IMPORTANT)

  • Ag⁺ → White ppt (AgCl)
  • Pb²⁺ → White ppt
  • Fe³⁺ → Reddish-brown ppt (Fe(OH)₃)
  • Fe²⁺ → Dirty green ppt (Fe(OH)₂)
  • Cu²⁺ → Blue ppt (Cu(OH)₂)
  • Ni²⁺ → Green ppt
  • Co²⁺ → Blue ppt (on heating)
  • Zn²⁺ → White ppt (Zn(OH)₂)
  • Al³⁺ → White gelatinous ppt

IMPORTANT EXAM POINTS

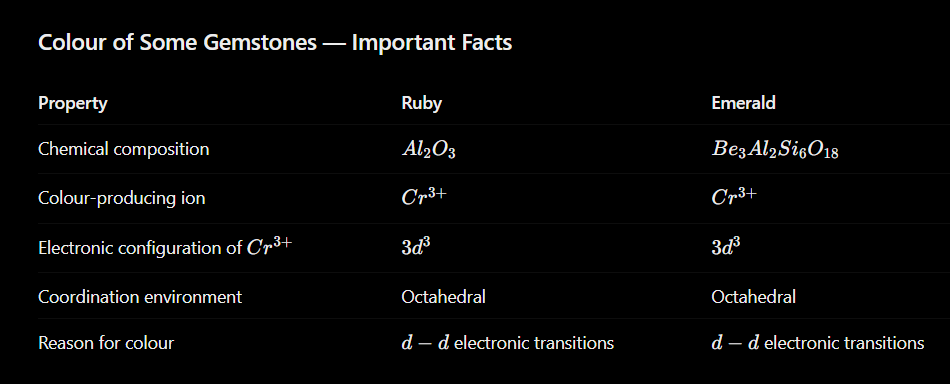
  • Colour is due to d–d transitions (transition metals)
  • d⁰ and d¹⁰ ions → colourless (Zn²⁺, Al³⁺ etc.)
  • Cu²⁺ always → blue solution (very important)

MOST ASKED

  • Blue solution → Cu²⁺
  • Green solution → Ni²⁺ / Fe²⁺ (trap!)
  • Pink → Co²⁺
  • Yellow/brown → Fe³⁺

SPECIAL REAGENTS – DETAILS

1. Nessler’s Reagent

Used for: Detection of NH₄⁺ (ammonium ion)

Composition

  • Alkaline solution of K₂HgI₄ (potassium mercuric iodide)

Observation

  • Brown colour / brown precipitate → NH₄⁺ present

Reaction idea

  • NH₃ (from NH₄⁺) reacts with Nessler’s reagent → coloured complex

One-line (viva)

Nessler’s reagent gives brown colour with ammonium ions.


2. FeSO₄ (Ferrous sulphate) – Brown Ring Test

Used for: Detection of NO₃⁻ (nitrate ion)

Reagents used

  • Fresh FeSO₄ solution
  • Concentrated H₂SO₄

Observation

  • Brown ring at junction of two layers

Key concept

  • Formation of nitrosyl complex

[Fe(H2O)5NO]2+[Fe(H_2O)_5NO]^{2+}

Important conditions

  • FeSO₄ must be fresh
  • H₂SO₄ added slowly along test tube wall

One-line (viva)

Brown ring test confirms presence of nitrate ion.


3. Copper Turnings Test

Used for: Detection of NO₃⁻ (nitrate ion)

Reagents used

  • Copper metal + conc. H₂SO₄

Observation

  • Brown fumes of NO₂ gas

Reaction idea

  • Nitrate gets reduced → NO₂ gas evolves

TEST FOR NICKEL (Ni²⁺) – KEY FACTS

1. Group Information

  • Group IV cation
  • Precipitated as NiS (black ppt) in basic medium (H₂S + NH₄OH)

2. Most Important Confirmatory Test

Dimethylglyoxime (DMG) Test

  • Reagent: Dimethylglyoxime (DMG) + NH₄OH
  • Observation: Bright red / rose-red precipitate
  • Compound formed: Nickel dimethylglyoxime complex

Very specific test for Ni²⁺


3. Reaction Idea

  • Ni²⁺ + DMG → Red complex (insoluble)

4. Other Supporting Facts

  • Ni²⁺ solution → Green colour
  • With NaOH → Green ppt (Ni(OH)₂)
  • With NH₄OH → forms complex (no ppt in excess)

What is Lake Test?

Lake test is used to detect Al³⁺ (aluminium ion) in salt analysis.


Principle

  • A lake is a coloured complex (dye + metal hydroxide) formed when a dye gets adsorbed on a gelatinous precipitate.

Procedure (short)

  • Add NH₄OH → forms Al(OH)₃ (white gelatinous ppt)
  • Add a dye (like alizarin / litmus)

Observation

  • Formation of a coloured “lake” (red/blue coloured ppt)

This confirms Al³⁺


Iodide of Millon’s base is involved in the Nessler’s reagent test.

In the test for NH4+ (ammonium ion), iodide of Millon’s base is involved in the Nessler’s reagent test.


Nessler’s Reagent (used for NH4+NH_4^+​ detection):

  • It contains alkaline solution of potassium tetraiodomercurate(II)

K2[HgI4]K_2[HgI_4] This is prepared using:

  • Mercury salts
  • Potassium iodide (KI)
  • KOH

During preparation, iodide of Millon’s base type species are formed.


Reaction with NH4+NH_4^+​:

When ammonium ion is present:NH4++2[HgI4]2+4OHHgOHg(NH2)I+7I+3H2ONH_4^+ + 2[HgI_4]^{2-} + 4OH^- \rightarrow HgO \cdot Hg(NH_2)I \downarrow + 7I^- + 3H_2O


Observation:

  • Brown precipitate forms
    This precipitate is called:

Iodide of Millon’s baseHgOHg(NH2)IHgO \cdot Hg(NH_2)I


Charcoal Cavity Test (CCT)

The charcoal cavity test is a dry test in qualitative inorganic analysis used to detect certain metal ions (cations) by heating them in a small cavity made in charcoal.


Procedure:

  • A small cavity (hole) is made in a piece of charcoal
  • A pinch of the salt is placed in it
  • Heated strongly using a blowpipe flame
  • Sometimes mixed with sodium carbonate (Na₂CO₃)

Principle:

  • Charcoal acts as a reducing agent
  • On heating, metal compounds are reduced to metal or metal oxide
  • Different metals give characteristic residues / coatings

Observations (Important for exams):

Metal ionObservation
Zn²⁺Yellow when hot, white when cold (ZnO coating)
Pb²⁺Yellow coating (PbO)
Cu²⁺Red metallic bead (Cu)
Ag⁺Shiny white metallic bead
Bi³⁺Yellow coating

Borax Bead Test — Full Concept for JEE / NEET

This is one of the most important dry tests in qualitative analysis to identify transition metal ions.


What is Borax?

Borax = Sodium tetraborate


Principle (CORE CONCEPT)

On heating, borax decomposes to form boric anhydride which reacts with metal oxides:

Step 1: Heating borax

Na2B4O72NaBO2+B2O3Na_2B_4O_7 \rightarrow 2NaBO_2 + B_2O_3

B2O3B_2O_3 = boric anhydride (glassy mass)


Step 2: Reaction with metal oxide

B2O3+MOM(BO2)2B_2O_3 + MO \rightarrow M(BO_2)_2

Forms colored metaborate bead


Why color appears?

  • Due to transition metal ions
  • Caused by d–d electronic transitions

Flame Types (VERY IMPORTANT)

Flame typeNatureUse
Oxidizing flame (O.F.)Excess oxygenMetal in higher oxidation state
Reducing flame (R.F.)Less oxygenMetal in lower oxidation state

Same metal → different color in OF & RF


Important Colors (JEE/NEET GOLD)

Metal ionOxidizing FlameReducing Flame
Cu²⁺Blue-greenRed (Cu₂O / Cu)
Co²⁺Deep blueDeep blue
Cr³⁺GreenGreen
Fe³⁺Yellow-brownBottle green
Mn²⁺Amethyst (purple)Colorless
Ni²⁺BrownGrey
VYellowGreen

Procedure (Short)

  1. Take a platinum wire loop
  2. Dip in borax → heat → forms colorless bead
  3. Add salt → heat in O.F. & R.F.
  4. Observe color

Key Points (Exam Focus)

  • Works mainly for transition metals
  • Bead = transparent glassy mass
  • Color depends on:
    • Metal ion
    • Oxidation state
    • Flame type
  • Cobalt always gives blue → very important MCQ

Common Mistakes Students Make

  • Ignoring reducing flame colors
  • Confusing Cu and Cr colors
  • Forgetting Mn becomes colorless in R.F.

Different Zones of Flame (very important for JEE/NEET)

1. Inner Zone (Dark Zone)

  • Location: Innermost part near burner
  • Color: Dark / almost invisible
  • Temperature: Lowest
  • Nature: Unburnt gases present (no combustion)

Contains mixture of fuel gas + air
No practical use in tests


2. Middle Zone (Luminous Zone)

  • Color: Yellow / bright
  • Temperature: Moderate
  • Nature: Reducing zone (incomplete combustion)

Contains glowing carbon particles
Gives sooty flame

Used in:

  • Reduction reactions
  • Sometimes in charcoal cavity test

3. Outer Zone (Non-luminous Zone)

  • Color: Blue
  • Temperature: Highest
  • Nature: Oxidizing zone (complete combustion)

Contains excess oxygen
Clean flame (no soot)

Used in:

  • Borax bead test (oxidizing flame)
  • Flame test
  • Most heating purposes

Brown Ring Test — for Nitrate
.

Reagents Used:

Fresh **Ferrous sulfate solution

Concentrated Sulfuric acid

Procedure:

Take the salt solution (suspected NO3−NO_3^-NO3−​)

Add freshly prepared FeSO₄ solution

Carefully pour conc. H₂SO₄ along the side of the test tube

Two layers form

Observation:
A brown ring appears at the junction of the two layers
Confirms presence of nitrate ion

⚙️Principle (CORE CONCEPT):
Step 1: Reduction of nitrate
NO3−+3Fe2++4H+→NO+3Fe3++2H2ONO_3^- + 3Fe^{2+} + 4H^+ \rightarrow NO + 3Fe^{3+} + 2H_2ONO3−​+3Fe2++4H+→NO+3Fe3++2H2​O
Nitrate is reduced to nitric oxide (NO)

Step 2: Formation of brown complex
[Fe(H2O)5(NO)]2+[Fe(H_2O)_5(NO)]^{2+}[Fe(H2​O)5​(NO)]2+
is nitrosyl complex gives the brown color

Key Points (Exam Focus):

Test confirms NO3 ​ (not nitrite)

Fresh FeSO₄ is essential

Brown ring forms at junction, not throughout solution

Complex contains NO (nitric oxide) ligand

Common Mistakes:

Shaking the test tube → destroys layers

Using old FeSO₄ → no result

Confusing with nitrite rick:
“Nitrate → NO → Brown complex ring”